How to edit Github code
Once you have cloned a repo it is likely you will want to make some changes to the code in it. To do that follow these steps:
For QA purposes we do not edit the main or dev branches directly, so you will need to create a branch of your own. To do that in R Studio click the ‘New Branch’ button in the Git window (remember to ‘Pull’ first to make sure you are working on up-to-date code, see step 5a for relevant screenshot).

You should then name your branch the same as the Jira ticket you are working on, for instance “B1-20 Extract and reformat RFI data”. Then click ‘Create’. The branch name next to the ‘New Branch’ button should now have the name of your branch.
Now is time for you to make your edits! Make any changes you need, following the coding standards, and frequently ‘commit’ (this is explained in the next step).
When you make and save some changes Git will notice, so any changed files will appear in the Git window. Committing is like telling git those changes are ready to be uploaded to Github (which will happen in the next step).
- Before you commit code there are a few bits of housekeeping to do to keep the repository consistent and clean, namely Styler and Lintr. If these are not installed, install them by running “install.packages(”““) in the console.
Pre-commit
- Once you have finished your code edits, click the “Addins” drop down on the top banner
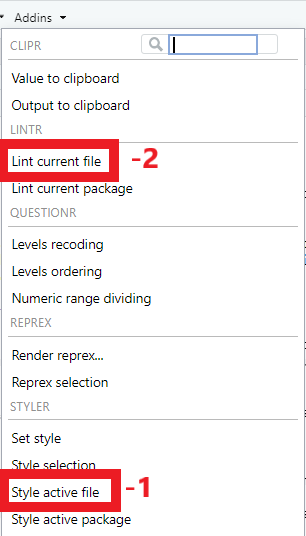
- Run “Style active file”
- Run “Lint current file”
- Click the “Markers” tab on the console pane and go through and address the linting issues highlighted

Commit
- Tick the box in the Git window for the files you wish to commit.
- Click the commit button.

In the window that opens, review your changes are as intended.
Then add a ‘Commit message’ explaining what you have done, and click commit underneath.
Note: At this stage a “pre-commit hook” will run, and run your file through styler and lintr automatically, warning you if your file isn’t linted as it should be. If you have any assumptions in your code, the pre-commit hook will find that assumption and add it to the assumptions_caveats_log.md - This will then need to be commited as well.
Close the window and go back to making changes.
- It is good practice to commit frequently so your changes are logged incrementally on Github.
Once you have committed all the changes you need, we can ‘push’ them to Github. You should do this once you have finished a ticket and whenever you stop working on the code e.g. for a meeting, to have lunch or at the end of the day. Follow these steps:
- Firstly it is good practice to ‘pull’ to check no-one has changed our branch whilst we were working. Click the ‘Pull’ button and if prompted enter your Github username but instead of our password we need to use the token we generated in step 1 of ‘How to clone a repository’. Close any the Git pull pop-up.

- Now we are ready to ‘push’, click the ‘Push’ button and once again if prompted enter your Github username but instead of our password we need to use the token we generated in step 1 of ‘How to clone a repository’.

- You have now successfully pushed your changes to Github.